三、CNN花朵识别
如以前一样,参考链接:
深度学习100例-卷积神经网络(CNN)花朵识别 | 第4天_神经网络图像检索花卉识别-CSDN博客
1.下载数据集
gpu设置和以前一样。必要部分:
import matplotlib.pyplot as plt
import numpy as np
import os
import PIL
import tensorflow as tf
from tensorflow import keras
from keras import layers, models
import pathlib
下载:
dataset_url = "https://storage.googleapis.com/download.tensorflow.org/example_images/flower_photos.tgz"
data_dir = tf.keras.utils.get_file(fname = 'flower_photos',
origin = dataset_url,
untar = True,
cache_dir= '你的路径')
data_dir = pathlib.Path(data_dir)
print(data_dir)
查看路径输出如下:F:daydayupflower-photodatasetsflower_photos
里面的内容,5种类别的jpg图片集:

2.测试数据集并计算数量
image_count = len(list(data_dir.glob(r'*/*.jpg')))
print(image_count)
roses = list(data_dir.glob('roses/*.jpg'))
p1 = PIL.Image.open(str(roses[0]))
plt.imshow(p1)
plt.show()
使用glob获取指定路径下的所有jpg图片,后面p1尝试输出roses集中的一张图片。

3.数据集的预处理及划分数据集
train_ds = tf.keras.preprocessing.image_dataset_from_directory(
data_dir,
validation_split=0.2,
subset="training",
seed=123,
image_size=(img_height, img_width),
batch_size=batch_size)
val_ds = tf.keras.preprocessing.image_dataset_from_directory(
data_dir,
validation_split=0.2,
subset="validation",
seed=123,
image_size=(img_height, img_width),
batch_size=batch_size)
题外:设置随机种子可以确保可重复性,因为伪随机数生成器(PRNG)在生成随机数时实际上是根据种子值来确定的。PRNG使用种子值作为起点,然后按照某种算法生成一系列看似随机的数字。如果你在不改变种子的情况下多次使用相同的PRNG,它将生成相同的序列,因此结果将是可重复的。
输出数据集的标签:
class_names = train_ds.class_names
print(class_names)
4.可视化,看图玩(一个batch32张图)
plt.figure(figsize=(20, 10))
for images, labels in train_ds.take(1):
for i in range(20):
ax = plt.subplot(5, 10, i+1)
plt.imshow(images[i].numpy().astype("uint8"))
plt.title(class_names[labels[i]])
plt.axis("off")
plt.show()
输出的图片如下:

查看维度:
for image_batch, labels_batch in train_ds:
print(image_batch.shape)
print(labels_batch.shape)
break
 输出32张(一个batch),维度180*180*3的图片,标签32
5.搭建网络模型
先配置一下,加速
AUTOTUNE = tf.data.AUTOTUNE
train_ds = train_ds.cache().shuffle(1000).prefetch(buffer_size=AUTOTUNE)
val_ds = val_ds.cache().prefetch(buffer_size=AUTOTUNE)
搭建模型(前先进行归一化,不然训练的很差)
num_classes = 5
train_ds = train_ds.map(lambda x, y: (x / 255.0, y))
val_ds = val_ds.map(lambda x, y: (x / 255.0, y))
model = models.Sequential([
layers.Conv2D(16, (3, 3), activation='relu', input_shape=(img_height, img_width, 3)),
layers.MaxPooling2D((2, 2)),
layers.Conv2D(32, (3, 3), activation='relu'),
layers.MaxPooling2D((2, 2)),
layers.Conv2D(64, (3, 3), activation='relu'),
layers.Flatten(),
layers.Dense(128, activation='relu'),
layers.Dense(num_classes)
])
model.summary()
6.编译及训练
model.compile(optimizer='adam',
loss=tf.keras.losses.SparseCategoricalCrossentropy(from_logits=True),
metrics=['accuracy'])
history = model.fit(
train_ds,
validation_data=val_ds,
epochs=10
)
plt.figure(figsize=(12, 6))
plt.plot(history.history['accuracy'], label='accuracy')
plt.plot(history.history['val_accuracy'], label='val_accuracy')
plt.xlabel('Epoch')
plt.ylabel('Accuracy')
plt.ylim([0.2, 1])
plt.legend(loc='lower right')
plt.show()
test_loss, test_acc = model.evaluate(val_ds, verbose=2)
print(test_acc)
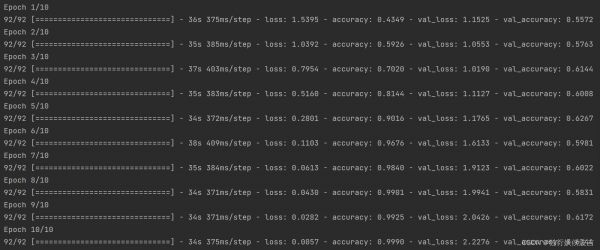
结果如下:


结果不尽人意,原文章作者说是过拟合的问题。我也感觉一个是训练集太少,一个是模型参数太大。下面是模型结构:

稍微改进:
将池化变为4*4,减少模型的参数:
model = models.Sequential([
layers.Conv2D(16, (3, 3), activation='relu', input_shape=(img_height, img_width, 3)),
layers.MaxPooling2D((4, 4)),
layers.Conv2D(32, (3, 3), activation='relu'),
layers.MaxPooling2D((4, 4)),
layers.Conv2D(64, (3, 3), activation='relu'),
layers.Flatten(),
layers.Dense(64, activation='relu'),
layers.Dense(num_classes)
])
减少参数后的模型:

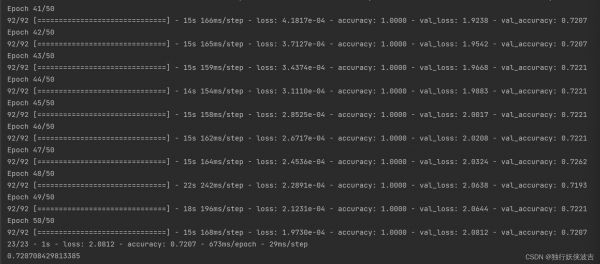
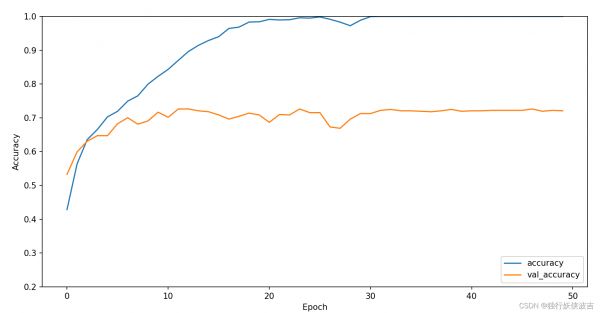
参数减少了40倍,训练结果如下(跑了50次试试):


最后结果是在72%左右,提升了10%,但依然不理想。就这样,后面再看吧。
总的代码:
import matplotlib.pyplot as plt
import numpy as np
import os
import PIL
from PIL import Image
import tensorflow as tf
from tensorflow import keras
from keras import layers, models
import pathlib
gpus = tf.config.list_physical_devices("GPU")
if gpus:
gpu0 = gpus[0]
tf.config.experimental.set_memory_growth(gpu0, True)
tf.config.set_visible_devices([gpu0],"GPU")
dataset_url = "https://storage.googleapis.com/download.tensorflow.org/example_images/flower_photos.tgz"
data_dir = tf.keras.utils.get_file(fname = 'flower_photos',
origin = dataset_url,
untar = True,
cache_dir= 'F:/daydayup/flower-photo')
data_dir = pathlib.Path(data_dir)
print(data_dir)
image_count = len(list(data_dir.glob(r'*/*.jpg')))
print(image_count)
roses = list(data_dir.glob('roses/*.jpg'))
p1 = Image.open(str(roses[0]))
plt.imshow(p1)
plt.show()
batch_size = 32
img_height = 180
img_width = 180
train_ds = tf.keras.preprocessing.image_dataset_from_directory(
data_dir,
validation_split=0.2,
subset="training",
seed=123,
image_size=(img_height, img_width),
batch_size=batch_size)
val_ds = tf.keras.preprocessing.image_dataset_from_directory(
data_dir,
validation_split=0.2,
subset="validation",
seed=123,
image_size=(img_height, img_width),
batch_size=batch_size)
class_names = train_ds.class_names
print(class_names)
plt.figure(figsize=(20, 10))
for images, labels in train_ds.take(1):
for i in range(32):
ax = plt.subplot(5, 10, i+1)
plt.imshow(images[i].numpy().astype("uint8"))
plt.title(class_names[labels[i]])
plt.axis("off")
plt.show()
for image_batch, labels_batch in train_ds:
print(image_batch.shape)
print(labels_batch.shape)
break
AUTOTUNE = tf.data.AUTOTUNE
train_ds = train_ds.cache().shuffle(1000).prefetch(buffer_size=AUTOTUNE)
val_ds = val_ds.cache().prefetch(buffer_size=AUTOTUNE)
num_classes = 5
train_ds = train_ds.map(lambda x, y: (x / 255.0, y))
val_ds = val_ds.map(lambda x, y: (x / 255.0, y))
model = models.Sequential([
layers.Conv2D(16, (3, 3), activation='relu', input_shape=(img_height, img_width, 3)),
layers.MaxPooling2D((4, 4)),
layers.Conv2D(32, (3, 3), activation='relu'),
layers.MaxPooling2D((4, 4)),
layers.Conv2D(64, (3, 3), activation='relu'),
layers.Flatten(),
layers.Dense(64, activation='relu'),
layers.Dense(num_classes)
])
model.summary()
model.compile(optimizer='adam',
loss=tf.keras.losses.SparseCategoricalCrossentropy(from_logits=True),
metrics=['accuracy'])
history = model.fit(
train_ds,
validation_data=val_ds,
epochs=50
)
plt.figure(figsize=(12, 6))
plt.plot(history.history['accuracy'], label='accuracy')
plt.plot(history.history['val_accuracy'], label='val_accuracy')
plt.xlabel('Epoch')
plt.ylabel('Accuracy')
plt.ylim([0.2, 1])
plt.legend(loc='lower right')
plt.show()
test_loss, test_acc = model.evaluate(val_ds, verbose=2)
print(test_acc)
相关知识
win 10 系统下利用tensorflow+python实现花朵识别——CNN模型
colab cnn实现花卉图片分类识别
基于CNN的花卉识别
智能识别花生病虫害:应用迁移学习与CNN
基于CNN的番茄叶片病虫害识别技术
满满干货!一文快速实现CNN(卷积神经网络)识别花朵
CNN实现花卉图片分类识别
pytorch实现简单卷积神经网络(CNN)网络完成手写数字识别
flower花朵识别数据集
【机器学习】花卉识别01
网址: 三、CNN花朵识别 https://m.huajiangbk.com/newsview567858.html
| 上一篇: 《花之歌》教案+类文阅读(部编版 |
下一篇: 业界精英进课堂 《谈如何开展中小 |