基于百度飞浆平台的‘鲜花识别程序设计’,GUI页面
目录
前言
一、认识这个项目类型?
二、深度学习步骤
1.数据处理
2.模型设计
3.训练配置
4.训练过程
5.模型保存
6.模型评估
7.模型预测
总结
前言
随着深度学习的普及,以前的特征提取这种大工程都将被替代,这个设计是我copy飞浆平台的一些代码,这个属于分类模型。使用的是VGG16。
鲜花识别(VGG+model)_副本:https://aistudio.baidu.com/aistudio/projectdetail/6345915?sUid=4638176&shared=1&ts=1687682569084
程序原发布:鲜花识别(VGG+model) - 飞桨AI Studio (baidu.com)
代码源程序请看最后。
一、认识这个项目类型?
这个项目是图像‘分类’,现在有很多处理图像分类的神经网络,比如:AlexNet、VGG、CNN、ResNet等等,而我们这个项目使用的神经网络是VGG16。
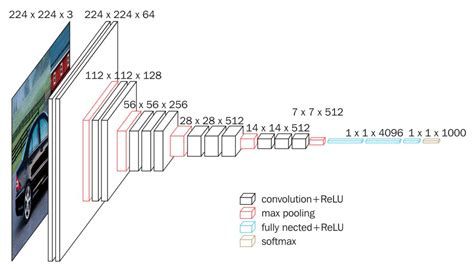
二、深度学习步骤
下图是来自飞浆平台的深度学习基本步骤

1.数据处理
定义异步数据加载器,边做加载,变处理数据,这样省时间。对图片的内容进行归一化,方便后续处理。
用到python类和对象。
class InferDataset(Dataset):
def __init__(self, img_path=None):
"""
数据读取Reader(推理)
:param img_path: 推理单张图片
"""
super().__init__()
if img_path:
self.img_paths = [img_path]
else:
raise Exception("请指定需要预测对应图片路径")
def __getitem__(self, index):
# 获取图像路径
img_path = self.img_paths[index]
# 使用Pillow来读取图像数据并转成Numpy格式
img = Image.open(img_path)
if img.mode != 'RGB':
img = img.convert('RGB')
img = img.resize((224, 224), Image.ANTIALIAS)
img = np.array(img).astype('float32')
img = img.transpose((2, 0, 1)) / 255 # HWC to CHW 并像素归一化
return img
def __len__(self):
return len(self.img_paths)
进行数据处理,产生字典。
def get_data_list(target_path, train_list_path, eval_list_path):
'''
生成数据列表
'''
# 存放所有类别的信息
class_detail = []
# 获取所有类别保存的文件夹名称
data_list_path = target_path + "flowers/"
class_dirs = os.listdir(data_list_path)
# 总的图像数量
all_class_images = 0
# 存放类别标签
class_label = 0
# 存放类别数目
class_dim = 0
# 存储要写进eval.txt和train.txt中的内容
trainer_list = []
eval_list = []
# 读取每个类别
for class_dir in class_dirs:
if class_dir != ".DS_Store":
class_dim += 1
# 每个类别的信息
class_detail_list = {}
eval_sum = 0
trainer_sum = 0
# 统计每个类别有多少张图片
class_sum = 0
# 获取类别路径
path = data_list_path + class_dir
# 获取所有图片
img_paths = os.listdir(path)
for img_path in img_paths: # 遍历文件夹下的每个图片
if img_path.split(".")[-1] == "jpg":
name_path = path + '/' + img_path # 每张图片的路径
if class_sum % 8 == 0: # 每8张图片取一个做验证数据
eval_sum += 1 # test_sum为测试数据的数目
eval_list.append(name_path + "t%d" % class_label + "n")
else:
trainer_sum += 1
trainer_list.append(name_path + "t%d" % class_label + "n") # trainer_sum测试数据的数目
class_sum += 1 # 每类图片的数目
all_class_images += 1 # 所有类图片的数目
else:
continue
# 说明的json文件的class_detail数据
class_detail_list['class_name'] = class_dir # 类别名称
class_detail_list['class_label'] = class_label # 类别标签
class_detail_list['class_eval_images'] = eval_sum # 该类数据的测试集数目
class_detail_list['class_trainer_images'] = trainer_sum # 该类数据的训练集数目
class_detail.append(class_detail_list)
# 初始化标签列表
train_parameters['label_dict'][str(class_label)] = class_dir
class_label += 1
# 初始化分类数
train_parameters['class_dim'] = class_dim
# 乱序
random.shuffle(eval_list)
with open(eval_list_path, 'a') as f:
for eval_image in eval_list:
f.write(eval_image)
random.shuffle(trainer_list)
with open(train_list_path, 'a') as f2:
for train_image in trainer_list:
f2.write(train_image)
# 说明的json文件信息
readjson = {}
readjson['all_class_name'] = data_list_path # 文件父目录
readjson['all_class_images'] = all_class_images
readjson['class_detail'] = class_detail
jsons = json.dumps(readjson, sort_keys=True, indent=4, separators=(',', ': '))
with open(train_parameters['readme_path'], 'w') as f:
f.write(jsons)
print('生成数据列表完成!')
2.模型设计
使用的是VGG16,网络深度达到16层,使用的是3*3的卷积核,参考深度学习12. CNN经典网络 VGG16 - 知乎 (zhihu.com)
class VGGNet(paddle.nn.Layer):
def __init__(self):
super(VGGNet, self).__init__()
self.convpool01 = ConvPool(
num_channels=3, num_filters=64, filter_size=3, pool_size=2, pool_stride=2, groups=2)
# 3:通道数,64:卷积核个数,3:卷积核大小,2:池化核大小,2:池化步长,2:连续卷积个数
self.convpool02 = ConvPool(
num_channels=64, num_filters=128, filter_size=3, pool_size=2, pool_stride=2, groups=2)
self.convpool03 = ConvPool(
num_channels=128, num_filters=256, filter_size=3, pool_size=2, pool_stride=2, groups=3)
self.convpool04 = ConvPool(
num_channels=256, num_filters=512, filter_size=3, pool_size=2, pool_stride=2, groups=3)
self.convpool05 = ConvPool(
num_channels=512, num_filters=512, filter_size=3, pool_size=2, pool_stride=2, groups=3)
self.pool_5_shape = 512 * 7 * 7
self.fc01 = paddle.nn.Linear(self.pool_5_shape, 4096)
self.fc02 = paddle.nn.Linear(4096, 4096)
self.fc03 = paddle.nn.Linear(4096, train_parameters['class_dim'])
def forward(self, inputs, label=None):
# print('input_shape:', inputs.shape) #[8, 3, 224, 224]
"""前向计算"""
out = self.convpool01(inputs)
# print('convpool01_shape:', out.shape) #[8, 64, 112, 112]
out = self.convpool02(out)
# print('convpool02_shape:', out.shape) #[8, 128, 56, 56]
out = self.convpool03(out)
# print('convpool03_shape:', out.shape) #[8, 256, 28, 28]
out = self.convpool04(out)
# print('convpool04_shape:', out.shape) #[8, 512, 14, 14]
out = self.convpool05(out)
# print('convpool05_shape:', out.shape) #[8, 512, 7, 7]
out = paddle.reshape(out, shape=[-1, 512 * 7 * 7])
out = self.fc01(out)
out = self.fc02(out)
out = self.fc03(out)
if label is not None:
acc = paddle.metric.accuracy(input=out, label=label)
return out, acc
else:
return out
3.训练配置
因为自己电脑没有GPU,所以使用了飞浆平台来进行训练。
'''
参数配置
'''
train_parameters = {
"input_size": [3, 224, 224], # 输入图片的shape
"class_dim": 11, # 分类数
"src_path": "data/data6504/flower7595.zip", # 原始数据集路径
"target_path": "data/", # 要解压的路径
"train_list_path": "data/train.txt", # train.txt路径
"eval_list_path": "data/eval.txt", # eval.txt路径
"readme_path": "data/readme.json", # readme.json路径
"label_dict": {'0': '栀子花', '1': '梅花', '2': '玫瑰', '3': '向日葵', '4': '莲花', '5': '郁金香',
'6': '百合花', '7': '雏菊', '8': '蒲公英', '9': '鸡冠花', '10': '水仙花'}, # 标签字典
"num_epochs": 20, # 训练轮数
"train_batch_size": 32, # 训练时每个批次的大小
"skip_steps": 10,
"save_steps": 300,
"learning_strategy": { # 优化函数相关的配置
"lr": 0.0001 # 超参数学习率
},
"checkpoints": "work/checkpoints" # 保存的路径
}
# 调用GPU进行运算
use_gpu = True
paddle.set_device(paddle.device.get_device()) if use_gpu else paddle.set_device('cpu')
4.训练过程
5.模型保存
6.模型评估
# 定义网络
import paddle
from flower.YCL import train_parameters, Reader
from flower.model import VGGNet
# 高层API
# 定义输入格式
input_define = paddle.static.InputSpec(shape=[-1, 3, 224, 224],
dtype="float32",
name="img")
label_define = paddle.static.InputSpec(shape=[-1, 1],
dtype="int64",
name="label")
model = VGGNet()
model = paddle.Model(model, inputs=input_define, labels=label_define)
params_info = model.summary((1, 3, 224, 224))
print(params_info) # 打印模型基础结构和参数信息
# 定义优化器
optimizer = paddle.optimizer.Adam(learning_rate=train_parameters['learning_strategy']['lr'],
parameters=model.parameters())
# 配置模型
model.prepare(optimizer=optimizer,
loss=paddle.nn.CrossEntropyLoss(), # 损失函数使用交叉熵,
metrics=paddle.metric.Accuracy()) # 评价指标使用准确率
# 训练。这里的Reader是刚刚已经定义好的,代表训练数据
model.fit(train_data=Reader(data_path='data', mode='train'),
batch_size=train_parameters['train_batch_size'],
epochs=train_parameters['num_epochs'],
save_dir="output/",
save_freq=300, # 保存模型的频率,多少个 epoch 保存一次模型
log_freq=20, # 日志打印的频率,多少个 step 打印一次日志
shuffle=True)
# 进行模型评估
model.evaluate(eval_data=Reader(data_path='data', mode='eval'), verbose=1)
7.模型预测
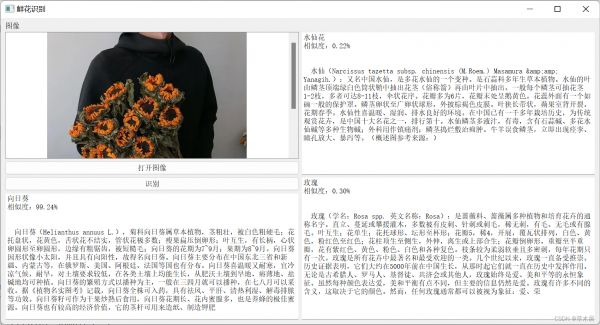
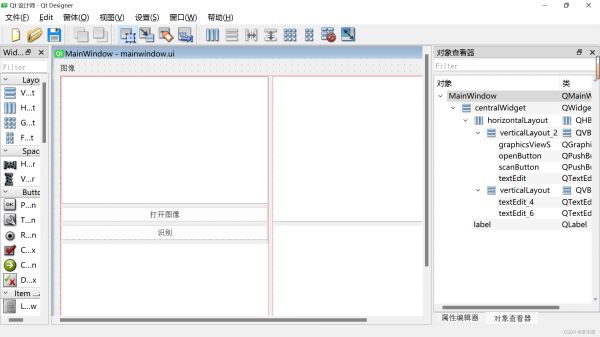
这里我添加了GUI页面,花的内容简介是我爬的。
import os
import urllib
import cv2
import numpy as np
from PIL import Image
import requests
import re
from urllib import parse
def get_intro(name):
name = name
name = urllib.parse.quote(name) # 将汉字转义
# 确定网址
url = 'https://baike.baidu.com/item/'+name
form_header = {
"User-Agent": "Mozilla/5.0 (Windows NT 10.0; Win64; x64) AppleWebKit/537.36 (KHTML, like Gecko) Chrome/88.0.4324.190 Safari/537.36",
"Host": "baike.baidu.com",
"Accept-Language": "zh-CN,zh;q=0.9",
"Accept": "text/html,application/xhtml+xml,application/xml;q=0.9,image/avif,image/webp,image/apng,*/*;q=0.8,application/signed-exchange;v=b3;q=0.9"
}
res = requests.get(url, headers=form_header).text
# print(res)
text = re.findall('<meta name="description" content="(.*?)">', res)
return ' '+text[0]
预测展示
三、GUI页面的设计
完整代码:
链接:https://pan.baidu.com/s/1wdmKkaXhcXlRzzJTrlTVyQ
提取码:13v2
gitee:这个平台是完整的讲解,但是没有训练好的模型,可以说不太完整。
鲜花识别: 期末课设,鲜花识别 (gitee.com)
飞浆:
鲜花识别(VGG+model)_副本:https://aistudio.baidu.com/aistudio/projectdetail/6345915?sUid=4638176&shared=1&ts=1687682569084
相关知识
微信小程序之植物识别demo(百度开发接口)
【病虫害识别】SVM病虫害识别系统【含GUI Matlab源码 2429期】
基于云平台的智能语音交互式灌溉系统
百度有钱花借款平台怎么样?怎么办理?
基于Matlab植物虫害检测(GUI,注释svm算法)
基于深度学习YOLOv8\YOLOv5的花卉识别鲜花识别检测分类系统设计
YOLO模型实现农作物病虫害虫识别带GUI界面
百度接口实现花卉识别
农作物叶片病虫害识别与监控系统的设计
基于PPYOLO的智能害虫防治机器人
原文链接: 基于百度飞浆平台的‘鲜花识别程序设计’,GUI页面 https://m.huajiangbk.com/newsview720507.html
| 上一篇: 卷积神经网络(CNN)鲜花的识别 | 下一篇: 基于PaddleClas2.3 ... |


