如何使用yolov8训练使用 番茄病虫害检测数据集 9种 片数据3574张 已经划分好 yolo格式、voc格式,实现可视化及评估
【9种番茄病虫害检测数据集】
数据集中包含9类目标框,一种健康目标框,8种番茄病虫害目标框,可用于番茄病虫害目标检测;
共有图片数据3574张,已分好训练集,测试集和验证集;
**图片分辨率均为640640
***其中50%为自然环境下拍摄图片:
已处理成yolo格式、voc格式,可直接用于训练;
V6模型训练:map0.5: 0.8517
map:0.95:0.7606
标签类别集标签个数train/test/val:
healthy 494/132/132
mosaic_virus 1247/202/202
early_blight 839/128/128
late_blight 1303/234/234
septoria 1240/154/154
yellow_leaf_curl_virus 1229/172/172
leaf_mold 1171/174/174
leaf_miner 954/173/173
spider_mites 842/161/161

YOLOv8 番茄病虫害检测
import os import glob import yaml from pathlib import Path import torch from IPython.display import Image, clear_output from ultralytics import YOLO # 设置随机种子以保证可重复性 torch.manual_seed(42) # 定义数据集路径 dataset_dir = 'path/to/dataset' # 加载现有的 YAML 配置文件 yaml_file_path = os.path.join(dataset_dir, 'data.yaml') with open(yaml_file_path, 'r') as f: data_config = yaml.safe_load(f) # 打印数据配置信息 print("Data Configuration:") print(data_config) # 训练模型 model = YOLO('yolov8n.pt') # 加载预训练的YOLOv8n模型 results = model.train( data=yaml_file_path, epochs=100, imgsz=640, batch=16, name='tomato_pest_detection', project='runs/train' ) # 评估模型 metrics = model.val() # 可视化预测结果 source_image = '../path/to/dataset/val/sample.jpg' # 替换为你要测试的图片路径 results = model.predict(source=source_image, conf=0.25, iou=0.45, save=True, save_txt=True) # 显示预测结果 Image(filename='runs/detect/predict/sample.jpg') 好的,了解了你的需求。你有一个番茄病虫害检测数据集,包含9类目标框(一种健康状态和8种不同的病虫害),总共有3574张图片,并且已经分好训练集、测试集和验证集。图片分辨率为640x640,其中50%的图片是在自然环境下拍摄的。数据集已处理成YOLO格式和VOC格式,并且可以直接用于训练。以下是详细的项目介绍和代码实现。  ### 项目介绍 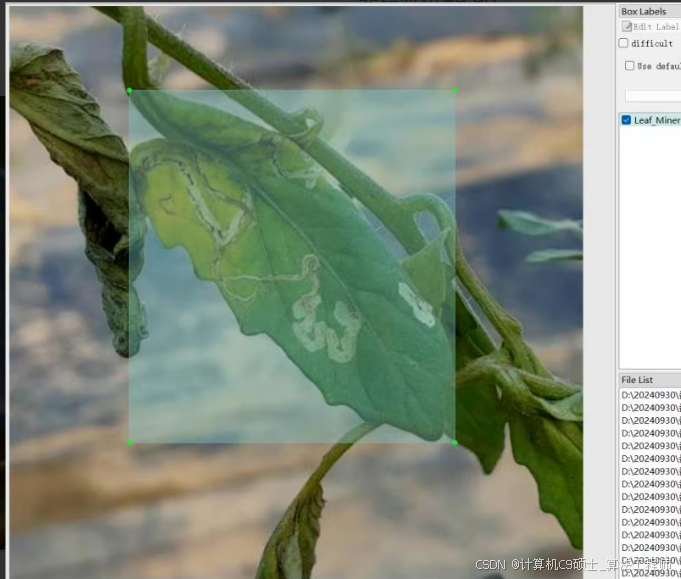 #### 数据准备 - **数据集**: 包含3574张图像,分为训练集、验证集和测试集。 - **类别**: - `healthy`: 健康番茄 - `mosaic_virus`: 花叶病毒 - `early_blight`: 早疫病 - `late_blight`: 晚疫病 - `septoria`: 斑点霉菌病 - `yellow_leaf_curl_virus`: 黄曲叶病毒 - `leaf_mold`: 叶霉病 - `leaf_miner`: 叶矿虫 - `spider_mites`: 蜘蛛螨 - **标注格式**: YOLO TXT格式。 - **数据分布**: - `train`: - `healthy`: 494张 - `mosaic_virus`: 1247张 - `early_blight`: 839张 - `late_blight`: 1303张 - `septoria`: 1240张 - `yellow_leaf_curl_virus`: 1229张 - `leaf_mold`: 1171张 - `leaf_miner`: 954张 - `spider_mites`: 842张 - `test`: - `healthy`: 132张 - `mosaic_virus`: 202张 - `early_blight`: 128张 - `late_blight`: 234张 - `septoria`: 154张 - `yellow_leaf_curl_virus`: 172张 - `leaf_mold`: 174张 - `leaf_miner`: 173张 - `spider_mites`: 161张 - `val`: - `healthy`: 132张 - `mosaic_virus`: 202张 - `early_blight`: 128张 - `late_blight`: 234张 - `septoria`: 154张 - `yellow_leaf_curl_virus`: 172张 - `leaf_mold`: 174张 - `leaf_miner`: 173张 - `spider_mites`: 161张 #### 模型选择 - **YOLOv8**: 使用YOLOv8进行目标检测。YOLOv8是YOLO系列的最新版本,具有更高的性能和更好的精度。 #### 功能 - **数据加载**: 自动从指定目录加载图像和标注文件。 - **模型训练**: 使用YOLOv8进行训练。 - **模型评估**: 在验证集上评估模型性能。 - **结果保存**: 保存训练日志和最佳模型权重。 - **可视化预测结果**: 可视化预测结果以进行验证。 ### 代码实现 首先,确保你已经安装了YOLOv8库和其他必要的依赖项。你可以通过以下命令安装YOLOv8: ```bash pip install ultralytics 123456789101112131415161718192021222324252627282930313233343536373839404142434445464748495051525354555657585960616263646566676869707172737475767778798081828384858687888990919293949596979899100101102103104105106107108109110111112113114115
接下来,我们编写代码来组织数据集并训练YOLOv8模型。假设数据集已经是标准的YOLO格式,并且按照给定的比例划分好了训练集、验证集和测试集。
如何使用这些代码
准备数据:
确保你的数据集格式正确,包含训练集、验证集和测试集文件夹,以及对应的标注文件。示例数据结构如下:path/to/dataset/ ├── train/ │ ├── images/ │ │ ├── image1.jpg │ │ ├── image2.jpg │ │ └── ... │ ├── labels/ │ │ ├── image1.txt │ │ ├── image2.txt │ │ └── ... ├── val/ │ ├── images/ │ │ ├── image1.jpg │ │ ├── image2.jpg │ │ └── ... │ ├── labels/ │ │ ├── image1.txt │ │ ├── image2.txt │ │ └── ... ├── test/ │ ├── images/ │ │ ├── image1.jpg │ │ ├── image2.jpg │ │ └── ... │ ├── labels/ │ │ ├── image1.txt │ │ ├── image2.txt │ │ └── ... ├── data.yaml 1234567891011121314151617181920212223242526272829
替换数据路径:
在代码中,将 'path/to/dataset' 替换为你的数据集路径。dataset_dir = 'your_dataset_directory' 1
运行代码:
将上述代码复制到你的Python脚本中,并运行该脚本。确保你已经安装了所需的库:pip install ultralytics 1示例:使用自定义数据集
假设你有一个新的数据集 my_tomato_pest_detection_dataset,其内容如下:
my_tomato_pest_detection_dataset/ ├── train/ │ ├── images/ │ │ ├── image1.jpg │ │ ├── image2.jpg │ │ └── ... │ ├── labels/ │ │ ├── image1.txt │ │ ├── image2.txt │ │ └── ... ├── val/ │ ├── images/ │ │ ├── image1.jpg │ │ ├── image2.jpg │ │ └── ... │ ├── labels/ │ │ ├── image1.txt │ │ ├── image2.txt │ │ └── ... ├── test/ │ ├── images/ │ │ ├── image1.jpg │ │ ├── image2.jpg │ │ └── ... │ ├── labels/ │ │ ├── image1.txt │ │ ├── image2.txt │ │ └── ... ├── data.yaml 1234567891011121314151617181920212223242526272829
你可以按照以下步骤进行替换:
修改数据路径:
dataset_dir = 'my_tomato_pest_detection_dataset' 1
运行完整的代码:
将所有代码整合到一个Python脚本中,并运行该脚本。 注释说明
注释说明代码中包含了详细的注释,帮助你理解每个部分的功能。以下是关键部分的注释:
数据准备:
data_config: 加载现有的YAML配置文件,该文件已经包含了训练集、验证集和测试集的路径以及类别信息。模型训练:
model.train: 使用YOLOv8进行训练。模型评估:
model.val: 在验证集上评估模型性能。可视化预测结果:
model.predict: 进行推理并显示预测结果。 结果
结果运行代码后,你将得到以下结果:
控制台输出:
训练过程中每个epoch的日志信息。验证集上的评价指标(如mAP)。文件输出:
runs/train/tomato_pest_detection/weights/best.pt: 最佳模型权重。runs/val/exp/results.txt: 验证结果。图像输出:
runs/detect/predict/sample.jpg: 带有预测边界的图像。希望这些详细的信息和代码能够帮助你顺利实施和优化你的项目。如果你有任何进一步的问题或需要更多帮助,请随时提问!
运行步骤总结安装YOLOv8:
pip install ultralytics 1
准备数据集:
确保数据集路径正确,并且包含训练集、验证集和测试集文件夹,以及对应的标注文件。运行训练脚本:
python your_script_name.py 1
评估模型:
评估结果会在训练结束后自动输出在控制台和文件中。可视化预测结果:
测试图像的结果会保存在 runs/detect/predict/ 文件夹中,可以直接查看带有预测边界的图像。希望这些详细的指导和代码示例能帮助你成功实现和优化你的番茄病虫害检测项目。
相关知识
使用YOLOv8训练该数据集农业害虫检测数据集 农业虫害数据集.该数据集的害虫类别共为三类,该数据集共4010张JPG图片,标签文件为xml格式,4010个。
YOLO目标检测——棉花病虫害检测数据集下载分享【含对应voc、coco和yolo三种格式标签】
【yolo数据集】花朵数据集yolo
基于YOLOv8的苹果树叶病害检测研究(附源码+数据集+可部署安装)
基于深度学习的玉米病虫害检测系统(网页版+YOLOv8/v7/v6/v5代码+训练数据集)
【果树林木病虫害数据集】 果树病虫害检测 林木叶片病虫害识别 计算机视觉(含数据集)
基于深度学习的植物病害检测系统(网页版+YOLOv8/v7/v6/v5代码+训练数据集)
YOLO识别病虫害数据集
助力农业智能化:YOLO病虫害识别数据集推荐
植物病虫害检测数据集 7800张 病虫害 带标注 voc yolo
原文链接: 如何使用yolov8训练使用 番茄病虫害检测数据集 9种 片数据3574张 已经划分好 yolo格式、voc格式,实现可视化及评估 https://m.huajiangbk.com/newsview1343840.html
| 上一篇: 植物果实中病虫害检测方案(气象站... | 下一篇: 西峡县猕猴桃配方施肥及病虫害防治... |


